Disclosure: This post contains affiliate links in the form of text and images. If you click through them and make a purchase, I’ll earn a commission at no additional cost to you, which will support the blog.
If you’re in a hurry, click here to skip to Step 1 of launching your new Shopify store.
If you’re looking to launch a successful eCommerce business, but don’t have much knowledge or money on hand to invest in this business, then Shopify is your best solution here. And hence, you must know how to launch the Shopify store today correctly. This means that you have to follow the steps in the same order as I’ve written them down below.
With the Shopify eCommerce platform, by spending only $29 per month at a minimum, you’ll be able to create a fully functional and professional-looking eCommerce website. And the best part is that you don’t need any complicated skills, and you don’t need to hire any staff to create and run your eCommerce website on Shopify.

Shopify is an eCommerce platform built to provide maximum ease of use and comfort to even beginners in this business. Prominent celebrities like Logan Paul, Kylie Jenner, etc., are also running their eCommerce stores on the Shopify eCommerce platform.
So, you don’t have to worry about anything while launching your first Shopify store today.
In this article, I’ll take you step-by-step through how you can easily launch your Shopify store before going to bed tonight.
But before I start, let’s quickly go through the advantages and disadvantages of using the Shopify eCommerce platform for your business.
- Pros and Cons of Shopify eCommerce Platform
- Follow these Steps to Launch Your Shopify Store
- 1. Create Your Shopify Account
- 2. Understand the Shopify Admin Panel and Settings
- 3. How to Change Your Shopify Store Name
- 4. Buy or Connect a Custom Domain to Your Shopify Store
- 5. Create Product Listings In Your Shopify Store
- 6. Price Your Products Correctly
- 7. Create Product Collections for Your Shopify Store
- 8. Setup the Shopify Shipping Settings
- 9. Setup the Shopify Taxes
- 10. Create the Important Pages for Your Shopify Store
- 11. Install and Setup Shopify Store Theme
- 12. Customize Shopify Theme Correctly
- 13. Get a Logo for Your Shopify Store
- 14. Setup the Payment Processor for Your Store
- 15. Unlock Your Shopify Store
- 16. Install the Facebook Pixel on Your Shopify Store
- 17. Ensure Your Shopify Store's Proper Functionality
- Final Wrap Up

Pros and Cons of Shopify eCommerce Platform
PROS
- You can easily and quickly create your eCommerce store in Shopify even without coding skills.
- Shopify will host your website on their servers, so you don’t have to pay extra for the web hosting services.
- You also don’t have to pay for a shopping cart as it is already integrated into Shopify’s system.
- You can easily customize the Homepage, products, collections, etc., on your own.
- In Shopify, accepting and fulfilling orders is like a cakewalk.
- Shopify also has a massive list of free and paid themes and apps, which you can use for even better productivity of your eCommerce store.
- You can also publish blog articles here. Although they won’t be as good as WordPress, they are still good enough to get you going and to rank you in Google search results.
CONS
- In comparison to an eCommerce store built through the WooCommerce plugin on WordPress, Shopify may look a bit expensive to some of you. But I’m sure you don’t want to go through lots of hassle just to save a few bucks here and there.
- Buying a custom domain from inside the Shopify dashboard is expensive compared to buying that same domain from the Namecheap website. However, you can easily connect your existing or new domain from external sources to Shopify if you want.
- As your website will be hosted on Shopify servers, you won’t be able to control the powerful backend of your site, but it’s better that way as it reduces the chance of you messing something up big time.

Follow these Steps to Launch Your Shopify Store
1. Create Your Shopify Account
Open the www.shopify.com website and click “start free trial” after entering your new email address to create your new Shopify account, which will be FREE for the first 14 days. This will help you test and understand how the Shopify store’s backend works before you actually start paying for your monthly subscription.
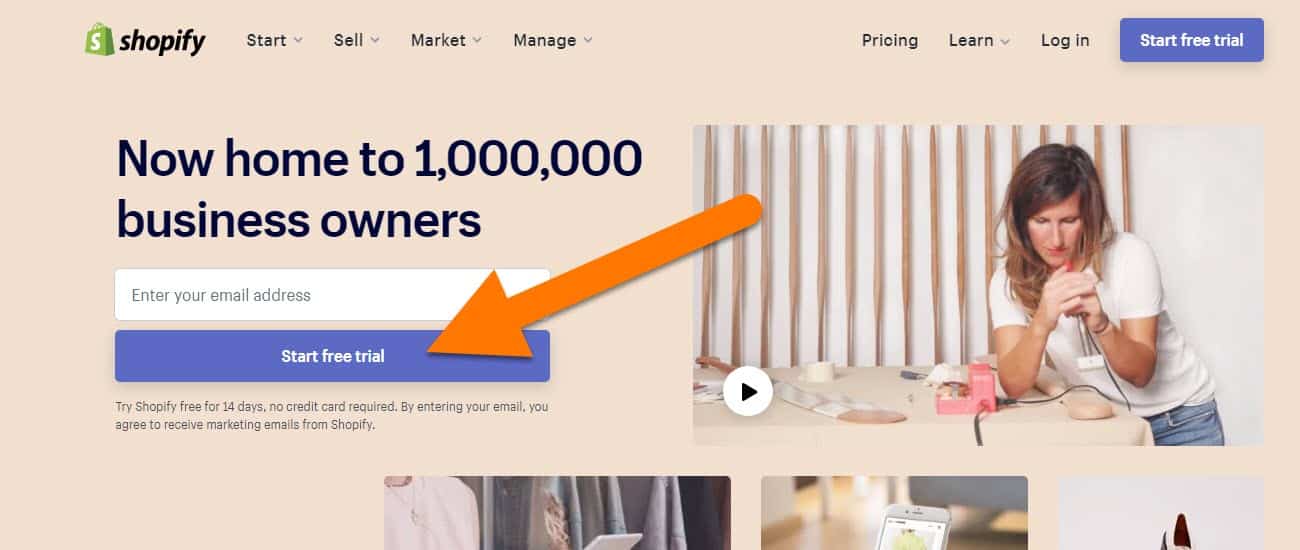
If you need help naming your Shopify store, you may try the and leandomainsearch.com to find some exciting name ideas for your store.
Now,
Although you don’t need to enter your credit/debit card details to create your Shopify store, you’ll need to enter them to unlock your store’s frontend for the public. So, I suggest you put your card details even in the beginning.
And don’t worry, as you won’t be charged any fee (except for the approximately $1 and refundable card authorization fee) until your 14 days trial period has expired.
Anyways,
Once you click the “start free trial” button, you’ll then need to enter your store’s new password and the store name.
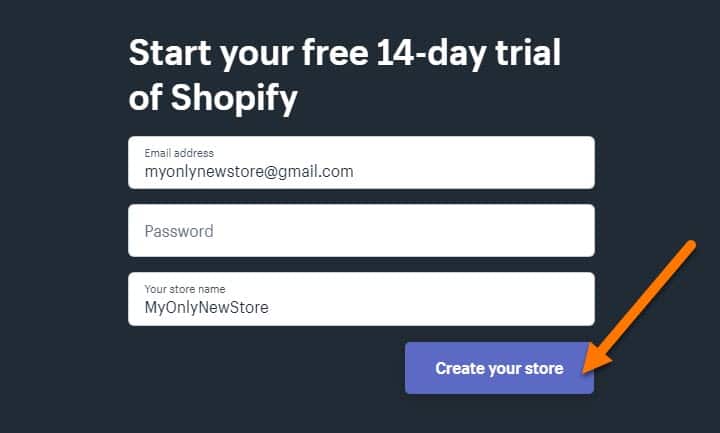
NOTE: A space between your store’s name will add a hyphen symbol to your domain. So, you should write your store’s name without space and change it later, as I’ve mentioned below. But as you’ll be using a custom domain anyway, it’s not much of a concern.
Once you click the “Create your store” button, you’ll be asked a few more questions on the next page, which you can skip if you want, as it’s just a survey from Shopify to understand how they can help you better in launching, running and growing your eCommerce business.
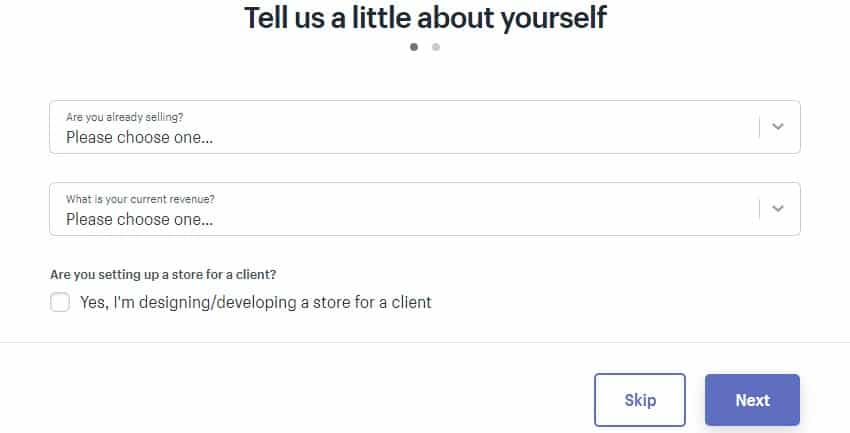
Moving on to the next page…
Here, you’ll have to enter your basic details. Here, you can either enter your company details if you own one. Otherwise, you can also just use your own name and home address or a P.O. box address, whichever makes you feel better.
NOTE: If you don’t know what a ZIP code or Postal code is, just do a quick google search for the ZIP code or postal code for your area.
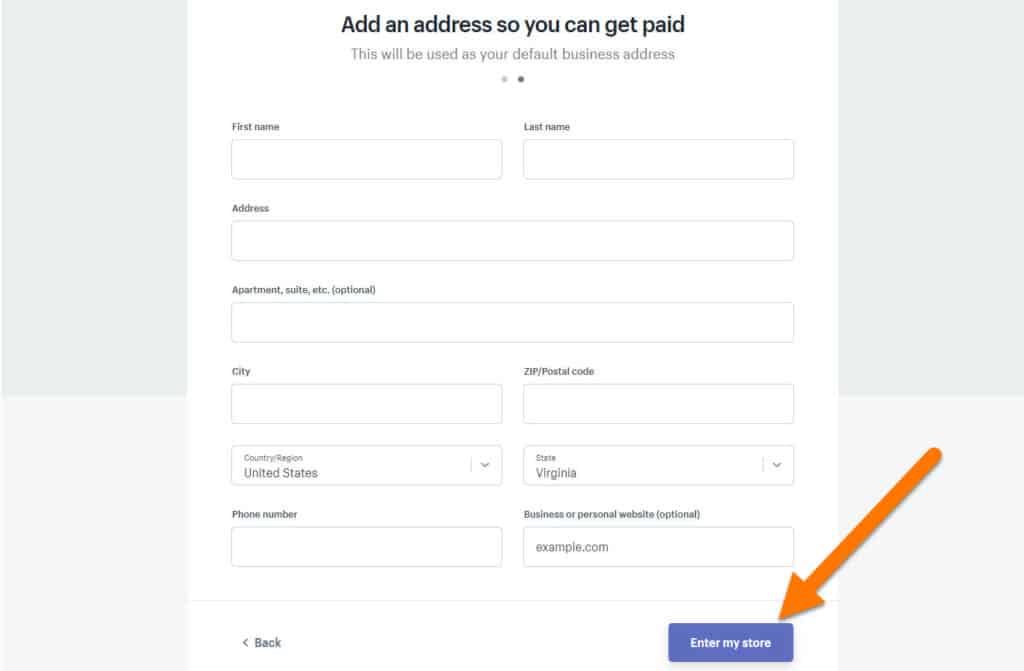
And yes, you’ll need to show your contact details on your Shopify store to make it look trustworthy. Also, showing your contact details is mandatory for running advertisements on your Shopify store on Facebook, Instagram, Google, etc.
Now, click that blue “Enter my store” button to access your Shopify dashboard page.
This was your first step towards launching your Shopify store today!

2. Understand the Shopify Admin Panel and Settings
Once you’ve finished Step 1 above, you’ll be redirected to your Shopify dashboard, which will look something like this, as shown in the image below.
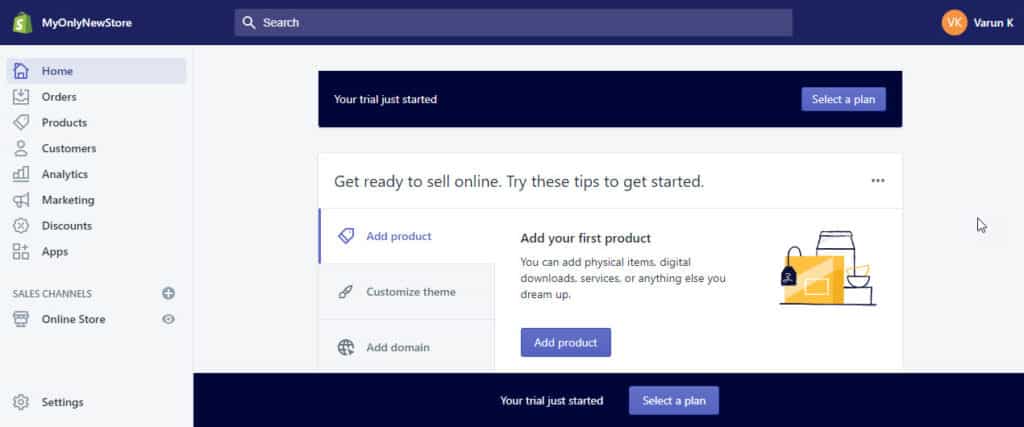
As you may have noticed that there’s a menu on the left side of your Shopify dashboard. That’s the place you’ll be using to surf through your Shopify store’s backend.
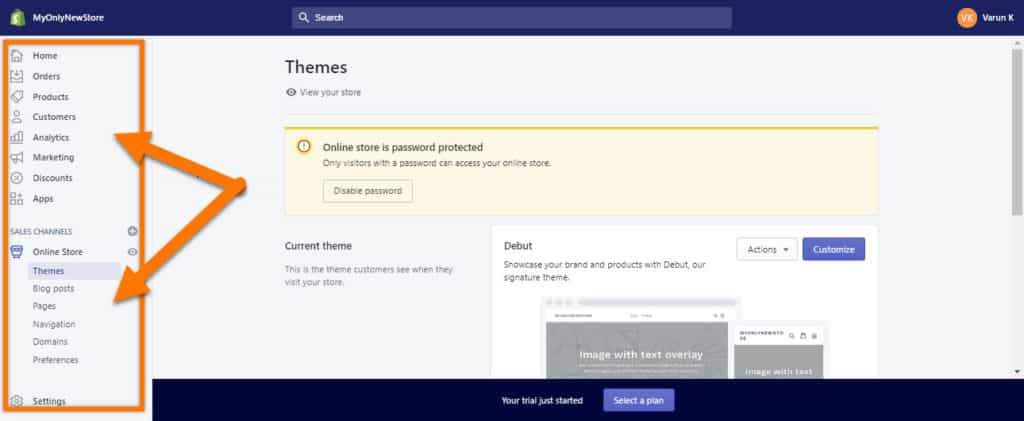
Here’s a basic explanation of all these Shopify dashboard menu items:
Home: This is what you’re seeing on your Shopify dashboard right now. It’ll show you a summary of total website sessions, number of orders, sales, etc., without going deep into the menus.
Orders: It’s the location where you’ll see all the orders placed or abandoned on your Shopify store. You’ll also be able to create draft orders which you would use if you’re getting orders through a phone call, for example. Moreover, this is where you’ll be able to track and fulfill your orders by sending your customers their order tracking numbers.
Products: You can create and customize new product entries in this section. Here, you also get to create different product collections similar to what you may have seen on other eCommerce websites.
Customers: Customers section of your Shopify dashboard will allow you to manage, edit and download the list of your customers, which you can also use for running different ads to your customers on Facebook.
Analytics: The analytics section lets you generate and analyze sales and store performance reports. Although how detailed reports you can generate depends on what Shopify payment plan you’re currently on.
Marketing: In this section, you create ads for your Shopify store without leaving your dashboard. Personally, I never used it.
Discounts: If you want to create any sort of discount coupons, whether manual or automatic, to be applied at your Shopify store’s checkout page, then this is where you’ll do this task.
Apps: To extend the functionality of your Shopify store far beyond, you’ll need to install some apps that you can access and set up from this section. Now, which apps to install is up to you, but do not install too many apps, as it’ll slow down your store website.
Online Store: This is where you’ll find a few store settings, themes section, checkout settings, navigations (menus), etc. This is where you’ll go to select a theme for your Shopify store.
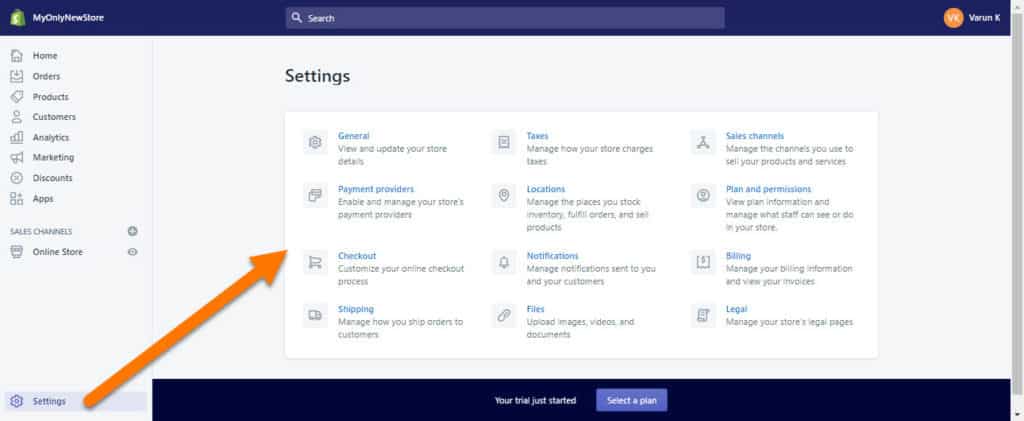
Settings: The settings tab, which is at the bottom of your left panel, lets you manage your store’s main settings, tax details, legal pages, shipping settings, payment processors, etc., as you can see in the image below.
3. How to Change Your Shopify Store Name
If you ever need to change your Shopify store’s name, then open settings, go to the “General” option, and change your store’s name over there.
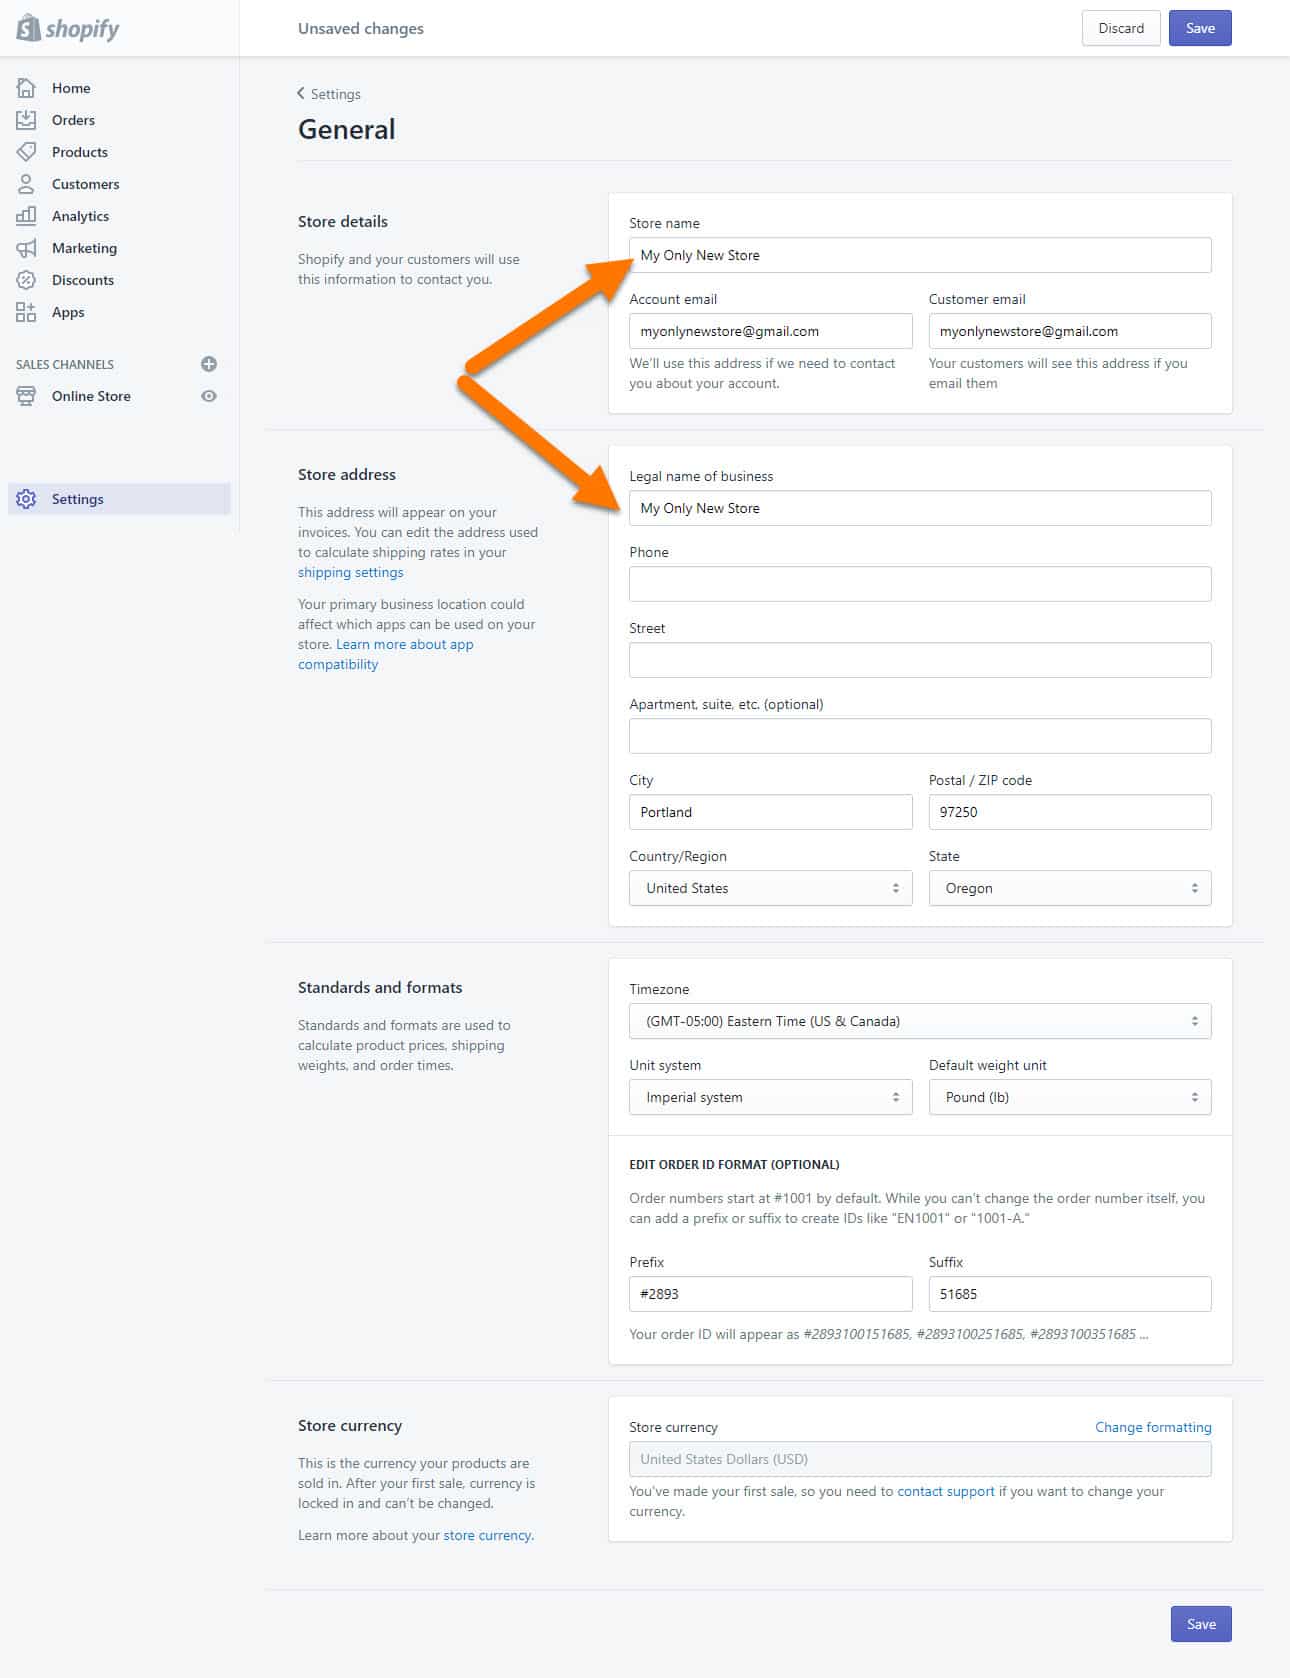
Once you change your store’s name, make sure to change it in all the places throughout your Shopify store; otherwise, it’ll create unnecessary confusion in the customer’s mind.
The “Account email” above is where the Shopify team will contact you, and the “Customer email” is where your customers or any website of your visitors will contact you.
Also,
Do not leave any blank space on that page as empty. The few blanks in my image are empty because I’m looking to reveal my personal details.
In the “Order Id Format” at the bottom of the page, enter random numbers in the Suffix and the Prefix so that the final order number doesn’t make your customer feel like he’s the first customer in your store.

4. Buy or Connect a Custom Domain to Your Shopify Store
Until this point, you had a Shopify subdomain which is yourstore.myshopify.com. But to look professional and build trust in your customer’s mind, you need to buy a custom domain for your Shopify eCommerce store before launching it to the public.
The first and more straightforward method is to go to the Domains area inside your admin panel’s Online store section and click the blue “Buy new domain” button. After this, just follow the simple instructions on that page.
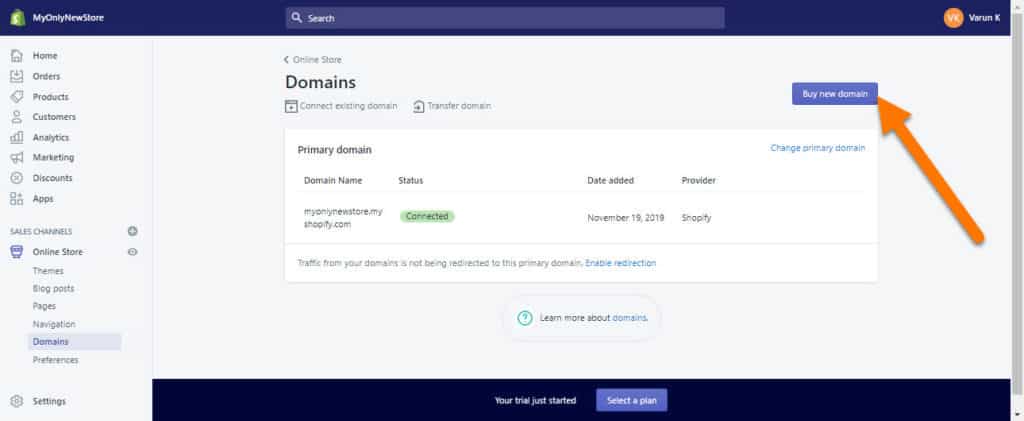
The second, cheaper, and more control-giving method is to buy your custom domain from Namecheap. For this method, follow these steps:
Step to buy your custom domain from Namecheap:
- Create your free account on namecheap.com.
- Search for your required domain name and add it to the cart.
- Do Not add any extra services or items to your cart.
- Install and Use (click on) this free chrome extension on the cart page to ensure that you’re paying the best price available.
- Ensure that the cart shows only the domain’s fee and ICANN fee (if any).
- Now, just finish your purchase by clicking the “continue” buttons and entering your required billing details.
Steps to point your purchased custom domain to the Shopify servers:
- Click the Manage button on the thank you page or go to the Domain List in the left admin panel of your Namecheap dashboard and click the Manage button in front of your domain name.
- Go to the Advanced DNS option from the top menu bar.
- Now, scroll down to HOST RECORDS and create/edit these 2 records, as shown in the image below.
- Also, click those green tick marks in front of both records to save your changes.
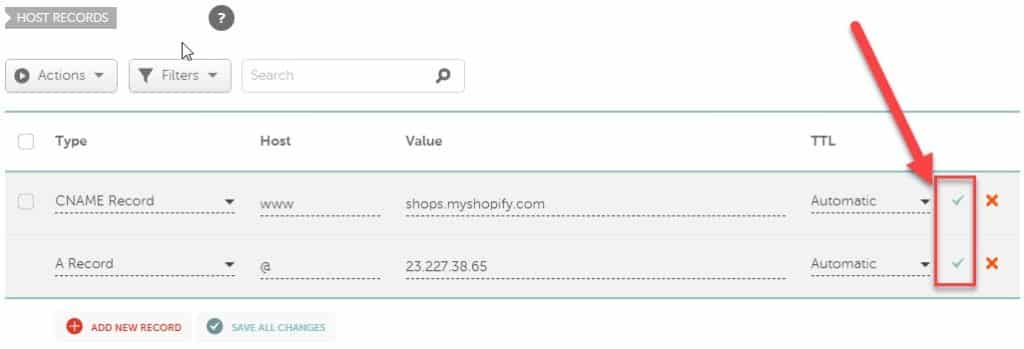
Steps to connect your purchased custom domain with your Shopify store:
- Go to Online store > Domains.
- Click the “Connect existing domain” link.
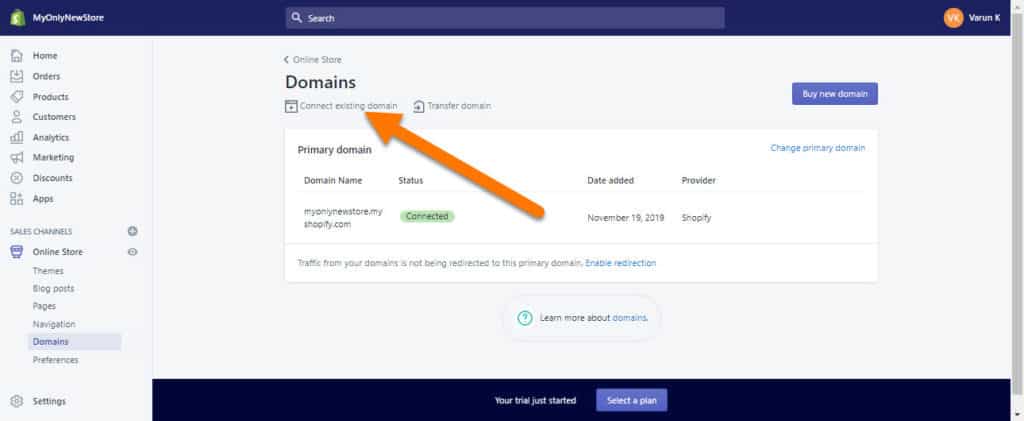
- On this page, enter your purchased domain and click the blue “Next” button.
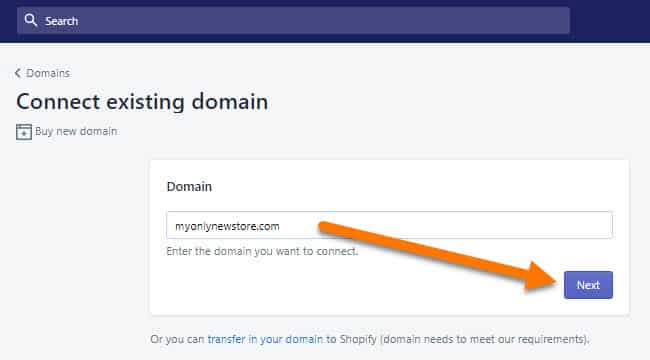
- Now, click the “Verify connection” button.
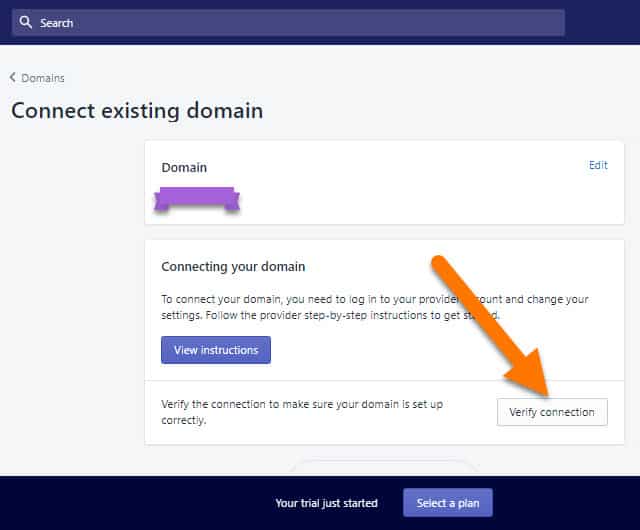
By the time you finish your store setup, this domain will be ready to function correctly. This can take a maximum of 24 hours but mostly gets processed within a few minutes.
So, if clicking the above “Verify connection” button gives you an error, just come back and repeat this step 4 once after finishing your whole store setup.

5. Create Product Listings In Your Shopify Store
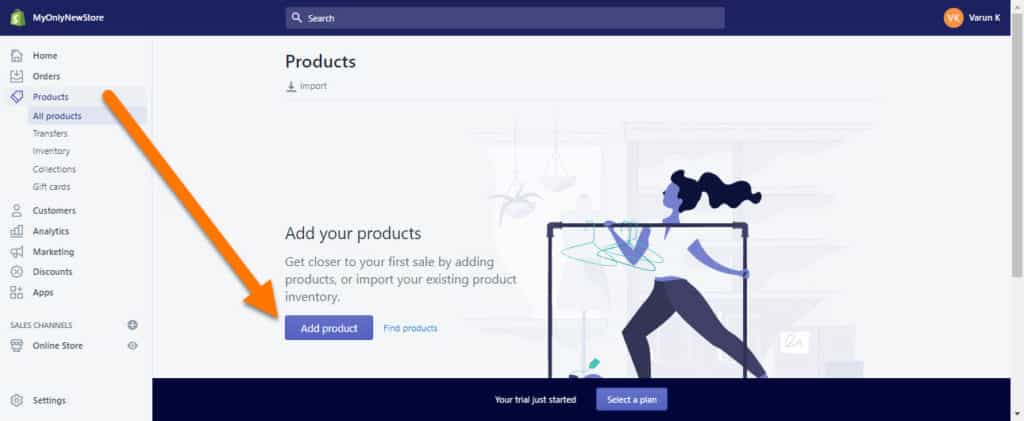
On clicking the “Products” tab in the admin panel, you’ll see a blue button saying “Add product“. Clicking it will give you all kinds of things to set up for your product, like its name, description, variants, prices, images, SEO data, etc.
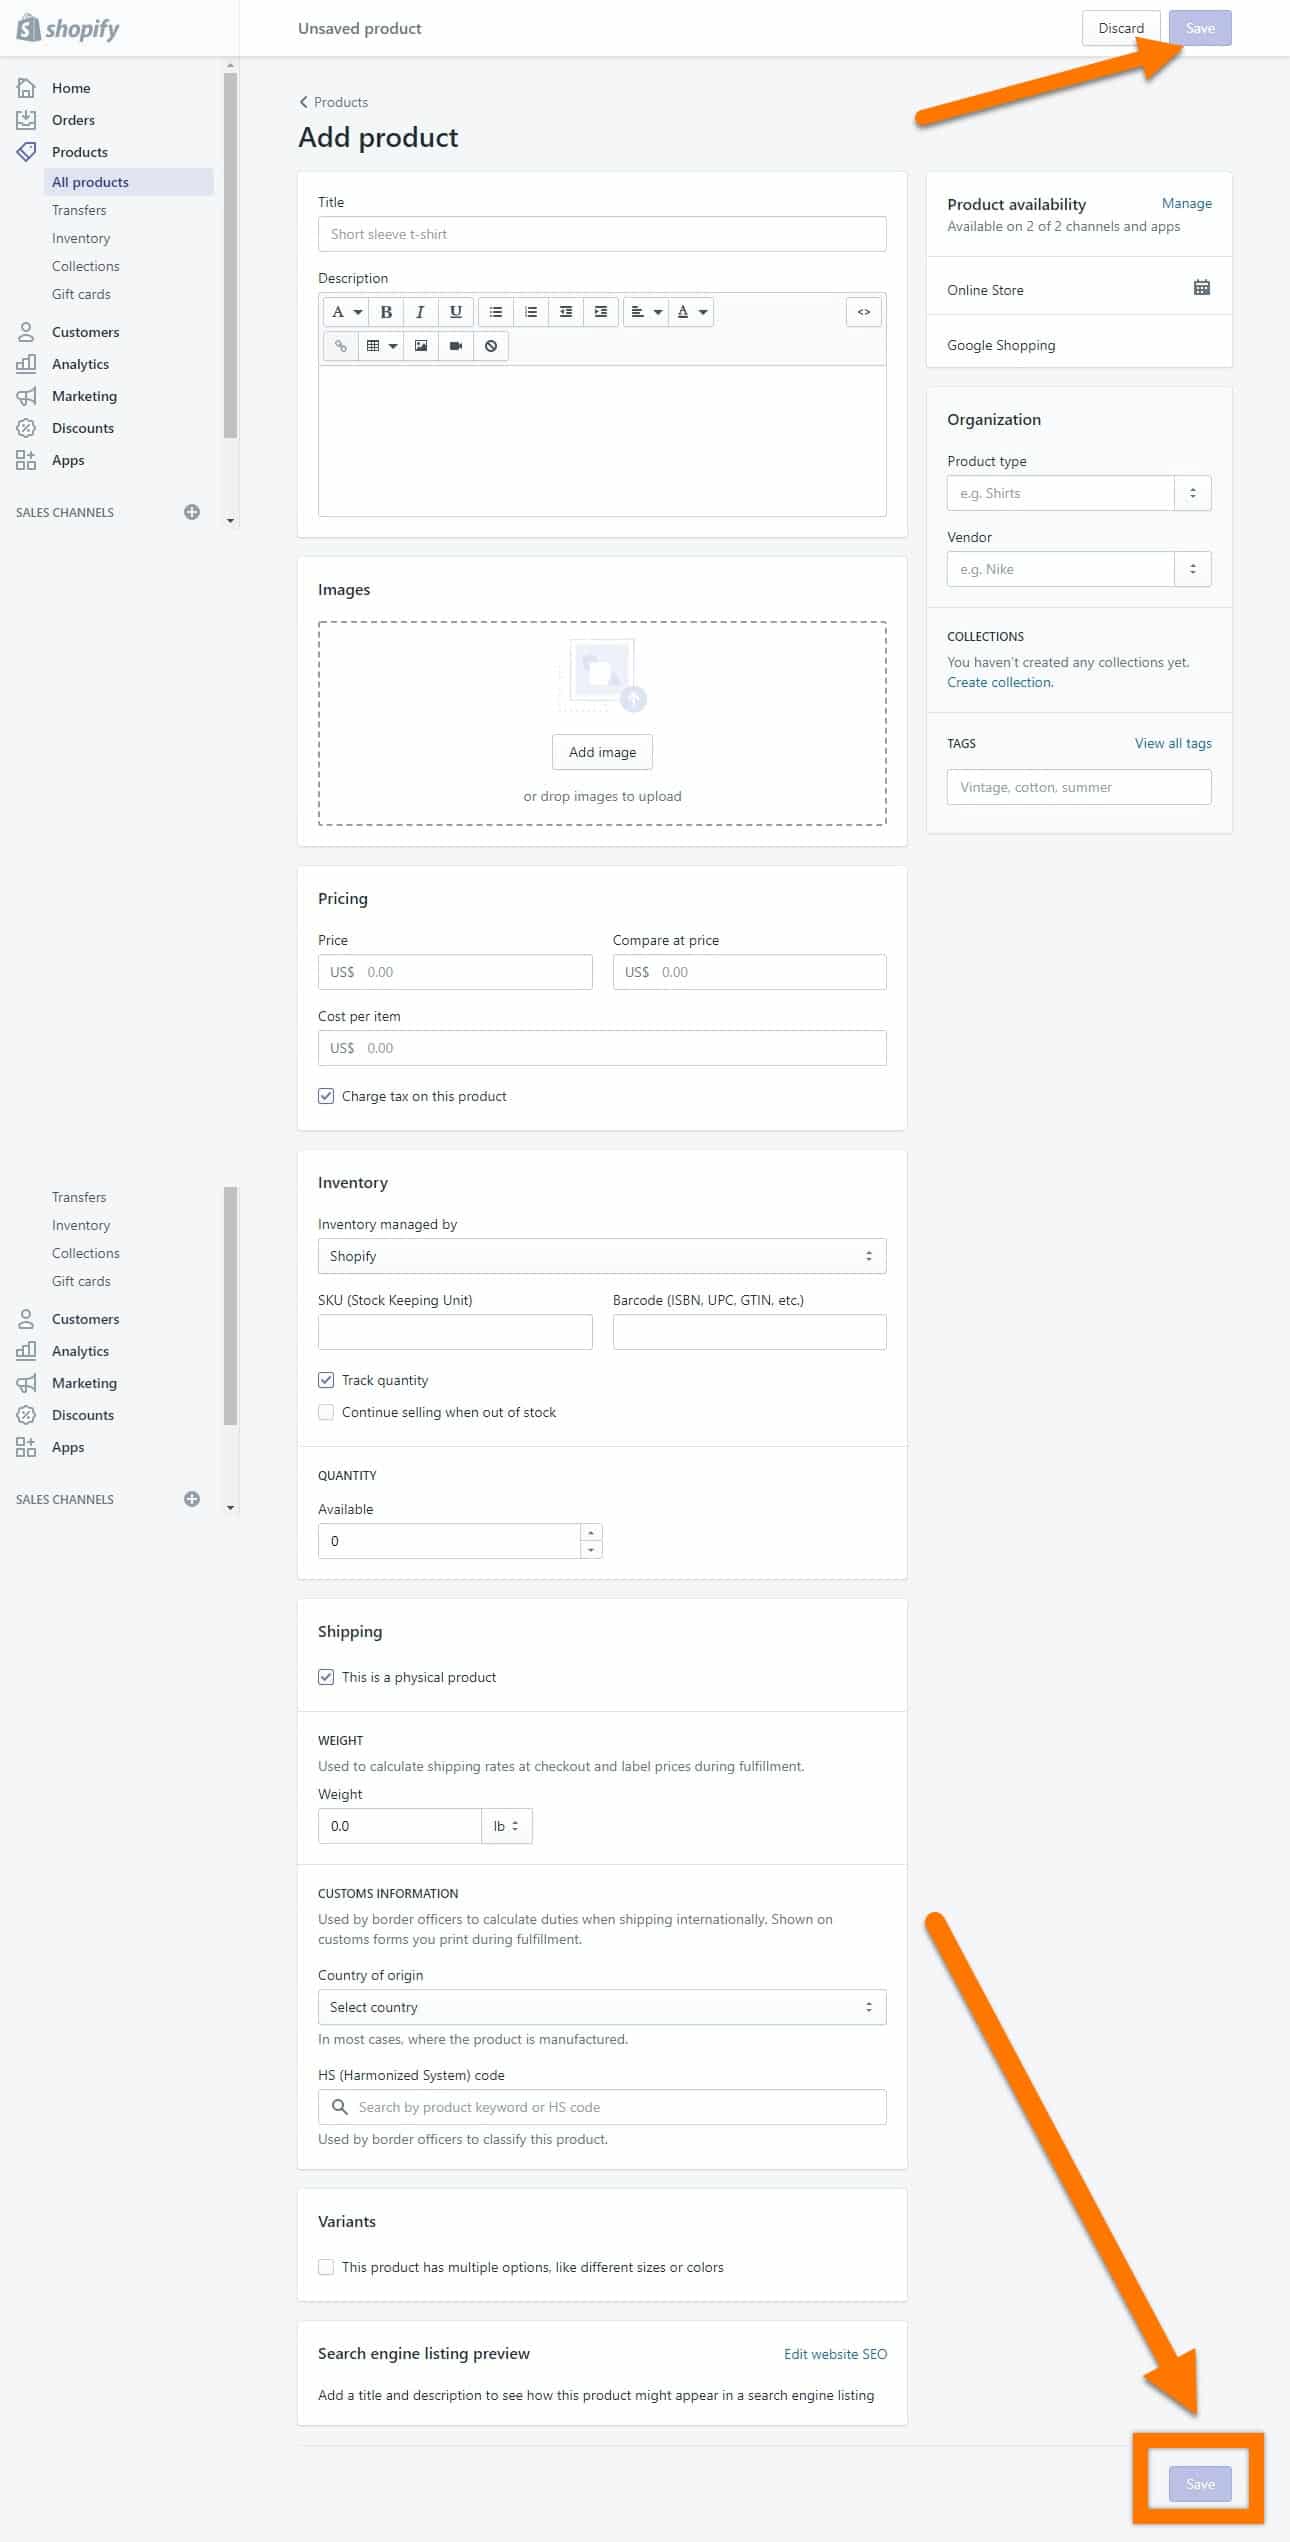
NOTE: SEO title and SEO description are what you want people to see about your page in the Google search results.
As you may know that images are a vital part of a product page. So, make sure to remove any logos from the images and texts that are not in your target customer’s language. Also, try to keep all the images of the same pixel dimensions for a better appearance of your product page.
After finishing everything you wanted, click the “Save product” button; otherwise, you’ll lose the changes you made on that page.

6. Price Your Products Correctly
The general rule of thumb while pricing the dropshipping products is to either multiply the product’s cost (including shipping fee) by 3 or add $10-$15 to the product’s cost (including shipping fee).
The basic idea is that you should earn at least $15-$25 as profits after paying for the product and advertising costs.
However, the pricing strategies vary depending on the product’s wholesale cost. This is done to avoid making your products look insanely expensive. For example, you can’t source a product for $200 and sell it for $600 unless you’ve seen it being sold at such a price on other successful websites.
NOTE: In the pricing section of your product pages, the price is what you want your product to sell at, and the compare at price will be shown, like $500, on your product pages.
Suppose you’re using an app like Oberlo or Dropified. In that case, you should not touch the Inventory settings in your product pages unless your connected supplier’s inventory went down to zero and you have another supplier to source your product from.

7. Create Product Collections for Your Shopify Store
The product collections add life to an eCommerce store. You can use these product collections to put similar products in the same groups. And sure, you can add the same product to multiple collections like Sports, Clearance Sale, Halloween Sale, etc.
So try to have some product collections on your website before launching your Shopify store.
To create your product collection, click the “Collections” tab inside the “Products” tab in your admin panel and then click the blue “Create collection” button.
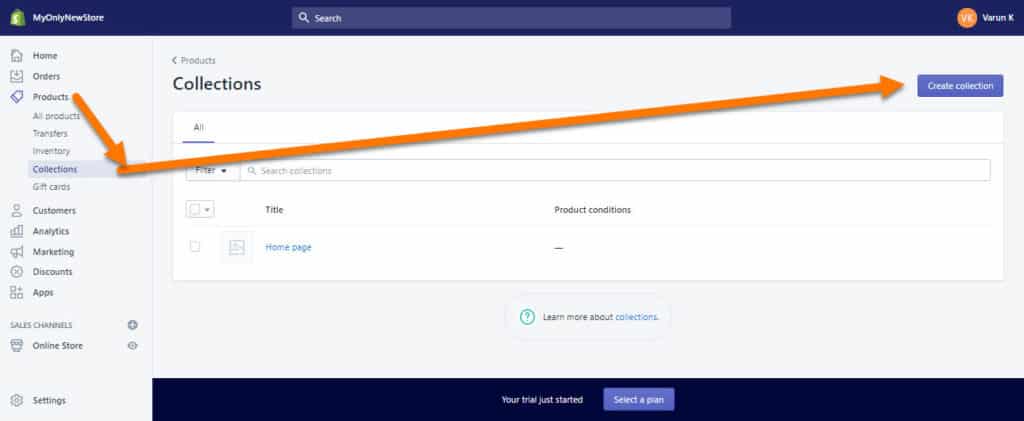
Here, you can set up these collections to either add the products automatically based on the conditions you set here… or you can add the products manually to these collections however you like.
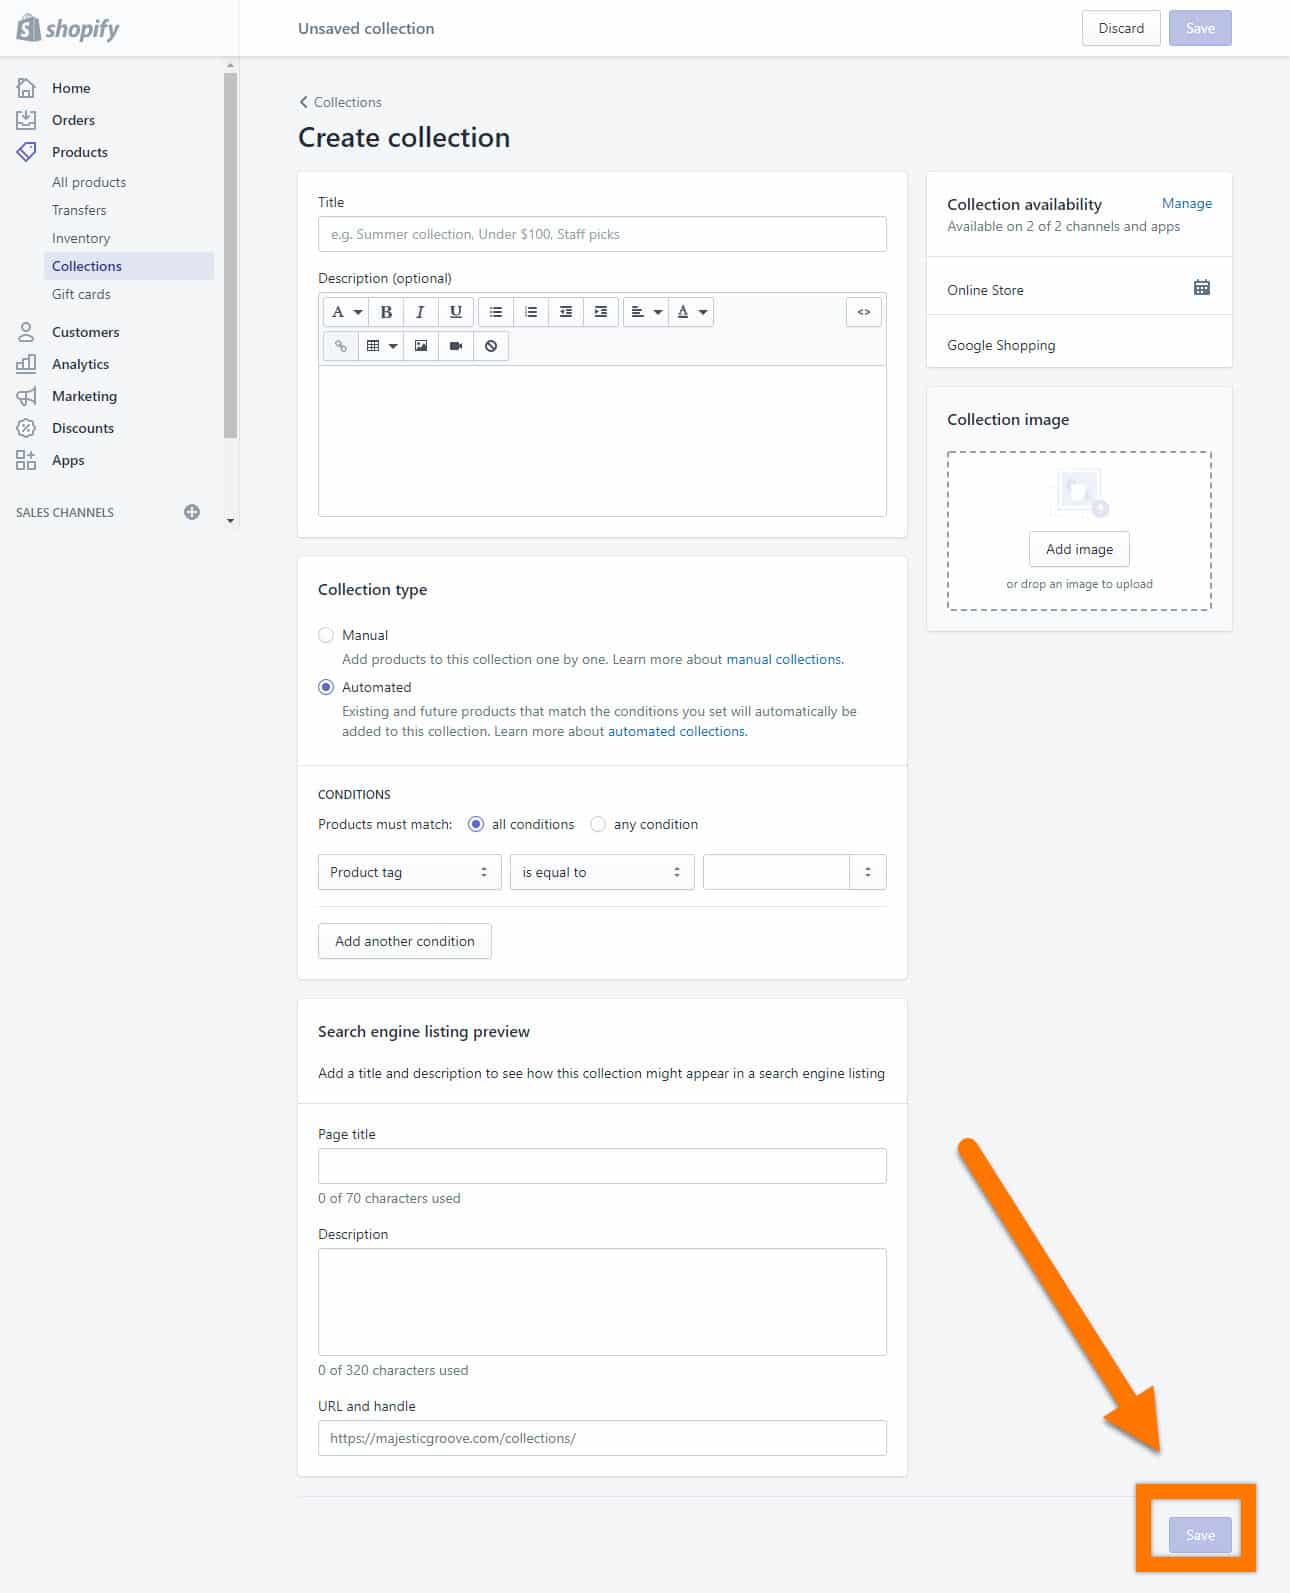
And feel free to add a featured image and a small description to your collections. This will improve your collection pages’ SEO (search engine optimization).
As you can see at the bottom, you can also add an SEO Page title and SEO Description for your collection page. Here, you’ll write how you want this collection page to appear in the Google search results by doing a related keyword search.

Make sure to click the “Save” button after finishing your product collection setup.

8. Setup the Shopify Shipping Settings

Shopify allows you to set up your shipping prices according to the cart price amounts and the total weight of the products in the customer’s cart. Here, you can also set up different shipping fees for different countries.
Unless you really feel the need to charge for shipping separately, I suggest you add the shipping cost within the product price and then provide free shipping to your customers.
This keeps your customers happy, and you’ll also be saved from the complications of setting so many shipping fees here and there. Also, you want to launch your Shopify store quickly today and not 2 weeks later.

9. Setup the Shopify Taxes

Now, this is something that only a lawyer or a chartered accountant can tell you. And this differs for each city, state, and country.
However, there’s always a minimum revenue threshold that you need to reach, after which you’re required to charge and pay these taxes.
So, if you don’t want to set this up in the beginning, then it should be fine. But again, I don’t know the legal requirements in your area.

10. Create the Important Pages for Your Shopify Store
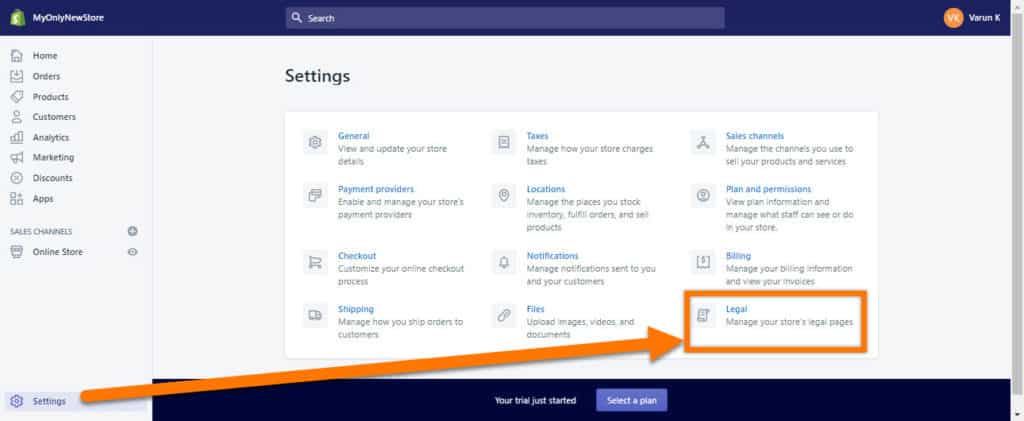
The Legal section inside the Settings menu provides you with the templates for your 3 pages:
- Refund policy
- Privacy policy
- Terms of service
To create these pages, click the “Create from template” button under each of the 3 boxes, as shown in the image below.
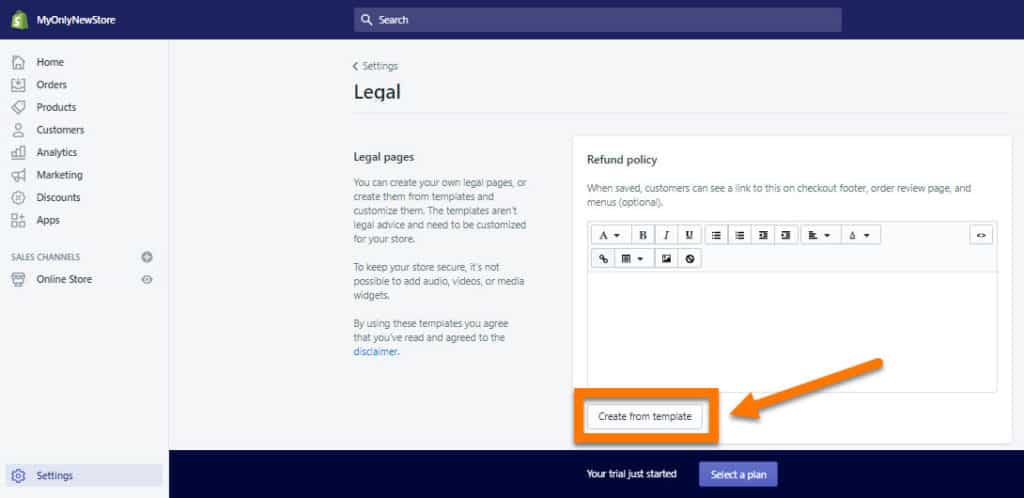
This section also gives you a blank box to write your Shipping policy which you’ll have to create on your own. But then make sure to make the required changes in the Refund Policy.
Links to all 4 of these pages will appear at the bottom of the checkout page. So, check that all the required changes are done on these pages.

After this, go to the Pages section in the Online store area of your admin panel and create these 4 pages there as well. In total, you’ll need to create these pages over there:
- Refund Policy
- Privacy Policy
- Terms of Service
- Shipping & Tax Policy
- Frequently Asked Questions (FAQs)
- About Us
- Contact
- Track Order
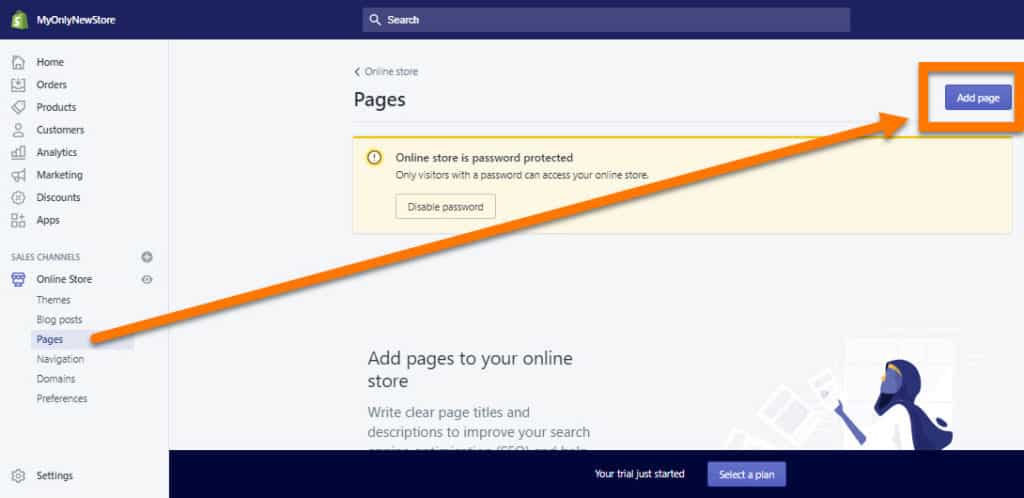
Now, you will copy the first 4 pages from the Legal section in the Settings area.
To set up the questions and answers for your Shopify store’s FAQs page, you’ll have to look at the FAQs pages of similar eCommerce websites in your industry.
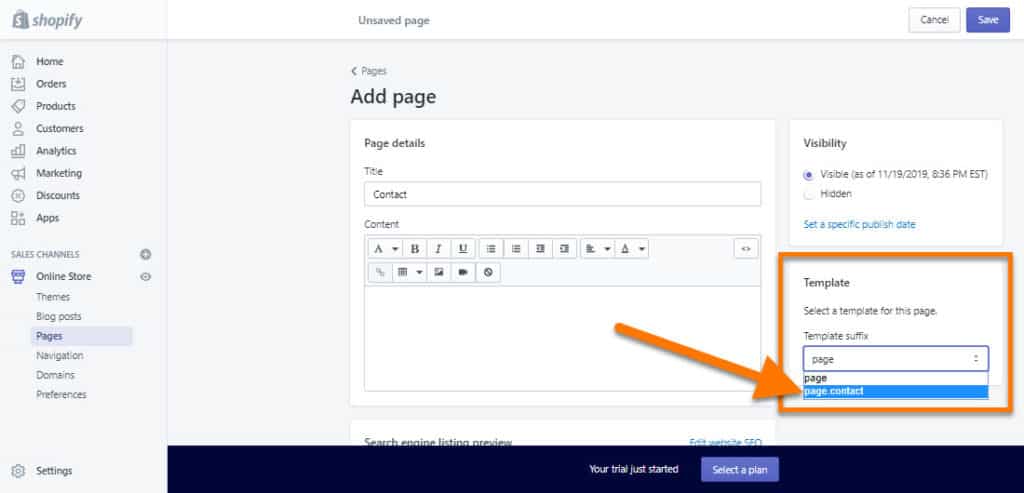
You can write a few lines on the Contact page if you want. Otherwise, change the page template as shown in the image below, and this page will be all set.
For the Track Order page, you can either add a link to your order tracking app, like Aftership’s order tracking page in your menu bar… or you can write up the steps on this page that your customers can follow to track their order on the courier’s company’s website.

11. Install and Setup Shopify Store Theme
Shopify themes, or what many call Shopify website templates, are your website’s basic framework and layout.
Your Shopify store, by default, comes with the free Debut theme, which is a great theme, but if you want, then you can check 7 more free themes provided in Shopify’s theme store.
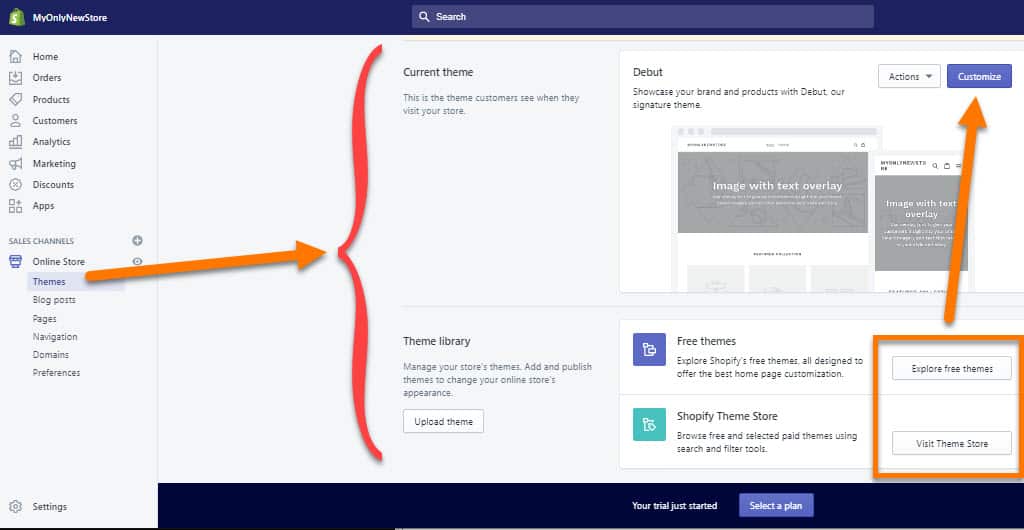
However, if you’re looking to build a much more enhanced Shopify store, then you should check this list of the best premium themes for your Shopify store.
Although the premium Shopify themes come with many customization options and may overwhelm you initially, you don’t have to worry much as most of that stuff is a simple toggle or drag & drop customization.
Once you’ve decided which Shopify theme will best suit your brand, then quickly get it downloaded (if you’re getting it from outside the Shopify theme store) and go to the “Themes” section inside the “Online store” menu from your Shopify’s admin panel.
Click the “Upload theme” button and select the downloaded zip file.
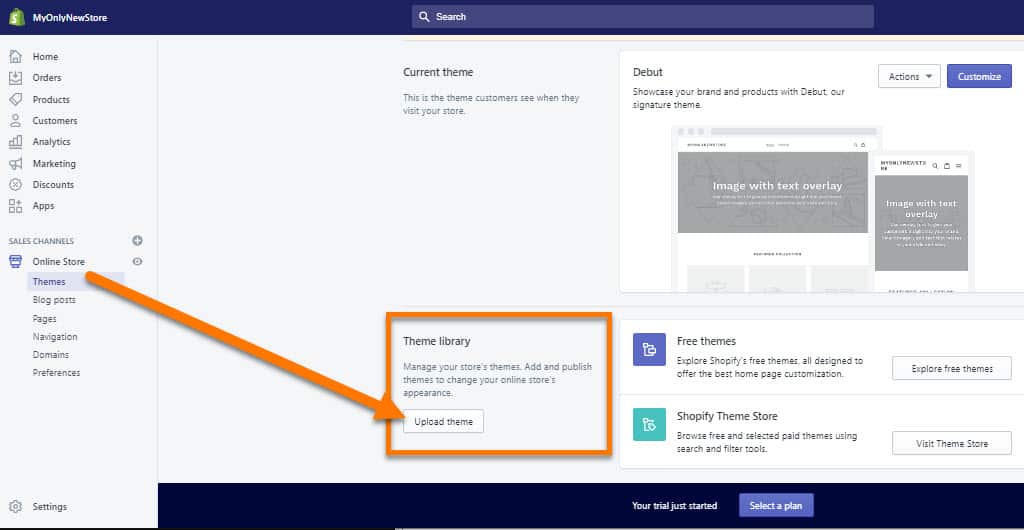
Once the theme file is uploaded to your Shopify server, click the “Publish” button and click “Customize” to start customizing the Shopify theme according to your brand’s identity.
NOTE: If you’re looking to install a theme from the Shopify theme store, you just have to click the Install button over there, and the rest theme installation part should be almost automatically done for you.

12. Customize Shopify Theme Correctly
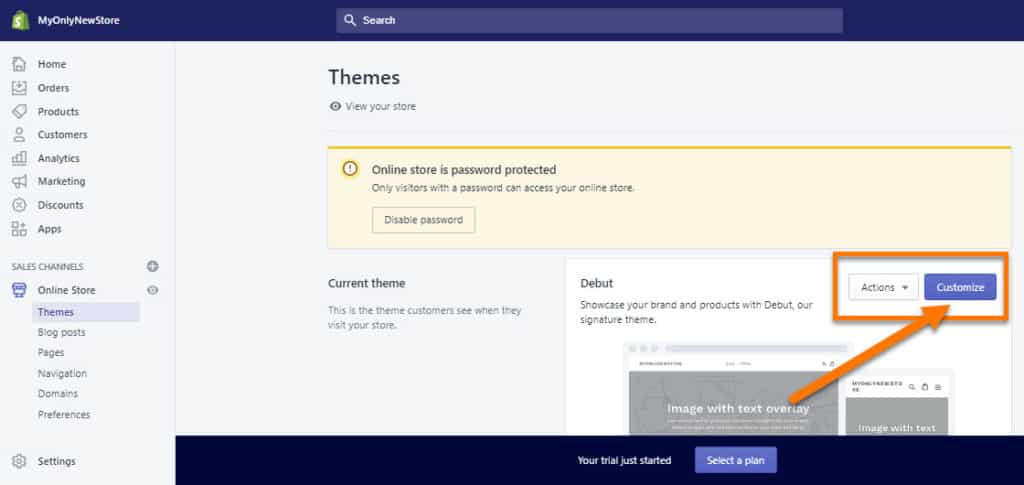
If you don’t have any creative skills, that’s fine. Do not try to create something new if you can’t… because you’ll probably end up making something hideous. I’ve seen many such Shopify stores.
So, you should just create the exact same homepage layout as you are seeing on the demo store of your chosen Shopify theme.
And for store colors, you can either go with the usual but fantastic black & white color scheme or click here to get some cool color combination ideas for your store.

13. Get a Logo for Your Shopify Store
I’m sure you may have heard about the website canva.com, which is used by many people for creating different images like Logos, YouTube thumbnails, Facebook banners, etc.
But I’ve noticed that the final output image from canva.com isn’t sharp enough. It doesn’t look that high quality when uploading it to your Shopify store.
So, I rather suggest you pay someone $5 (+$1 processing fee) on Fiverr and get a professionally done high-quality logo of 300 dpi.
You can also use Adobe Photoshop to create your logos and find many tutorial videos on YouTube.
In the end, also make sure to upload your logo to the checkout page. This creates a sense of continuity from the Store’s Homepage to the checkout page in the customer’s mind.

14. Setup the Payment Processor for Your Store
You can’t accept payments from your customers without setting up a payment processor.
Every country supports different payment processors. To know which ones are available in your country, just do a quick search on Google, and there you should see a link to Shopify’s payment gateways page, where you’ll get your required list of available payment gateways.
However, the most commonly used payment processors are PayPal and Shopify Payments (Stripe). If these are available in your country, then it’s better that you set up both of them in your store. But if only one of them is available, that’s fine too. Don’t freak out about such a little thing.
NOTE: To set up a payment processor on your Shopify store, you’ll first need to remove the password from your store. This can be done only after authorizing your credit/debit card on the billing page. However, you won’t be charged any fee until your 14 days trial period has expired.
To finish this task, click the blue “Select a plan” button on the dark blue bottom bar that you can see in all these images.
To set up the payment processors on your Shopify store, go to “Payment providers” inside the Settings tab from your admin panel. There, just activate your chosen payment processor.
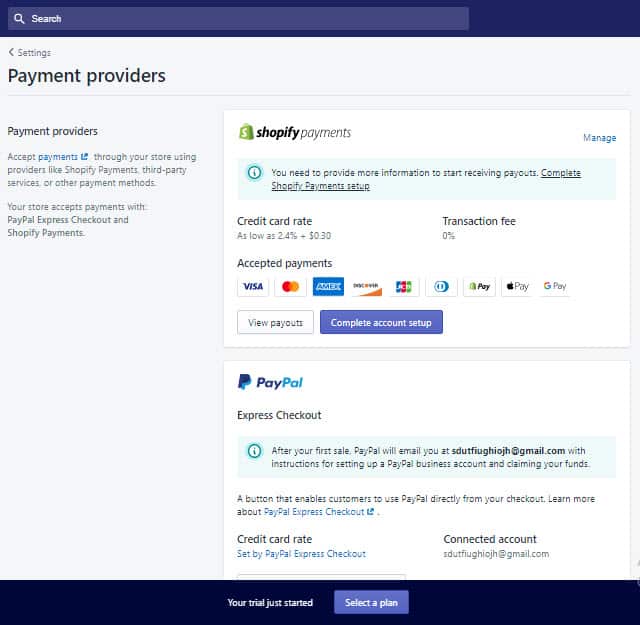
But first, you’ll need to create your supposedly free account on that payment gateway’s website.
For PayPal, if you’re creating a new account, then create a business account. If you already have a personal account on PayPal, you should see an option somewhere to convert your account to a business account.
If you decide to use a 3rd party payment processor like 2Checkout or CCavenue, etc., then you should know that the approval process is a bit complicated, and it’ll easily take you around a month or 2 to get approved (if you get approved). Most payment processing companies don’t support dropshipping businesses because of the bad reputation that some really dumb and idiot dropshippers have created for this business.
NOTE: After connecting the payment processors, If you put the password lock on your store again to do further store customizations, it may disconnect the payment processors from your store. So, check if all your payment processors work correctly every time you unlock your Shopify store.

15. Unlock Your Shopify Store
To unlock and remove the password from your Shopify store, you’ll need to go to the Preferences section under the “Online store” menu in your admin panel. There, “uncheck the box” in front of the text “Enable password” as shown in this image below.
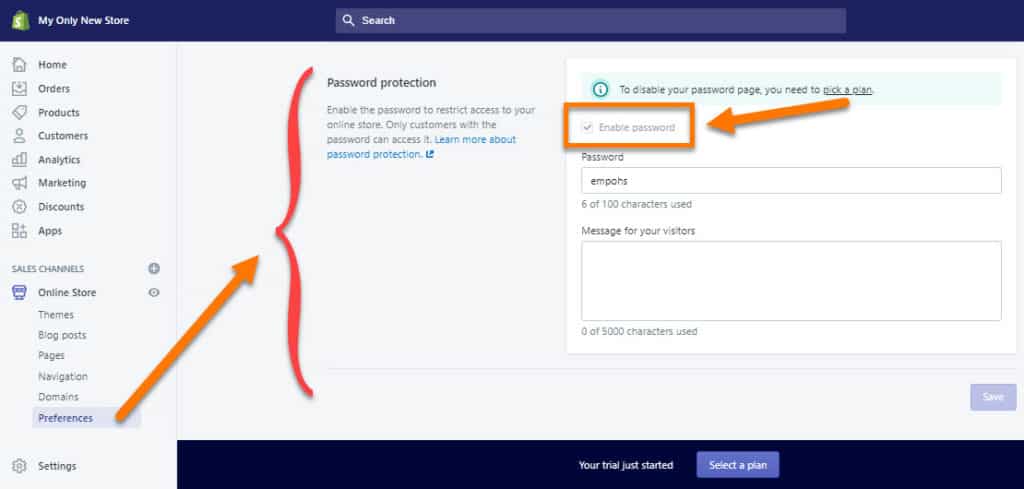
It’ll then ask you to enter your card details. Once you enter the details and click the button, you’ll be charged around $1 on your card, which will be instantly refunded to you, although it may take 3-7 days to get back into your bank account.
After this successful card authorization, your store will be unlocked and opened for the public to visit and purchase stuff from you.

16. Install the Facebook Pixel on Your Shopify Store
Facebook pixel is a script that lets you track the sales, ad post engagement, and many things on your Shopify store, which you can use to scale your store even more.
To install the Facebook pixel on your Shopify store, follow these steps below:
- Signup on business.facebook.com using your Facebook account login details.
- After getting into the dashboard, click on the “3 bars icon” in the top left corner to open the menu.
- Click “Pixels” under the Data sources section.
- Create a new pixel there and then copy and paste that numeric code into the Facebook pixel box in the “Preferences” section inside the “Online store” tab from your Shopify admin panel.
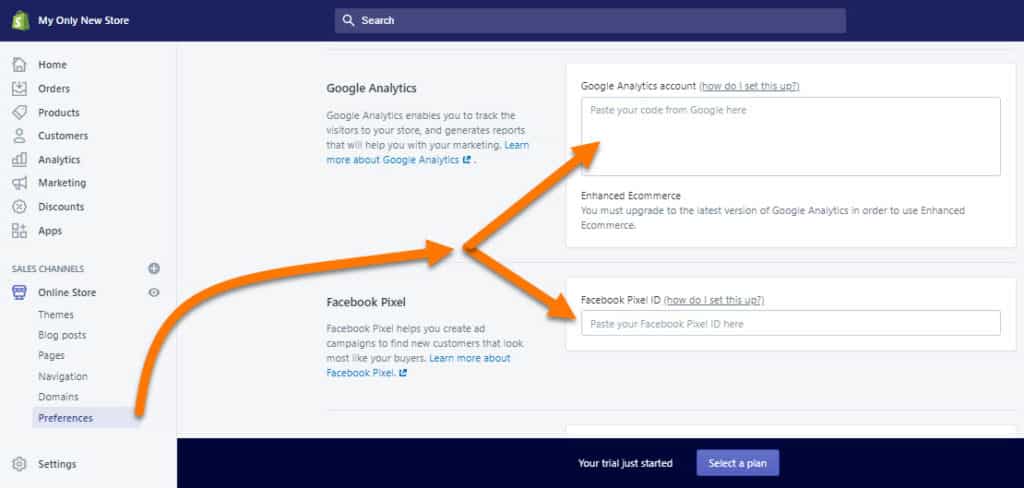
NOTE: If you can, install Google Analytics and a Heatmap tracker for better analytical data. I could show the steps here, but it would become too long of an article.

17. Ensure Your Shopify Store’s Proper Functionality
This often happens with many people, and a few days back, even I forgot to set up the payment processor, due to which my Facebook ad account got disabled.
But this is just one setting.
You have to take a few good minutes and go through all the parts of your Shopify store to ensure that everything is correct and working at its finest. Otherwise, you’ll also be sitting there with a facepalm like me at that moment.
Make sure to verify your custom domain if it wasn’t verified earlier, and then try opening your website and see if everything, including the URL, is coming up fine.

Final Wrap Up
Now, your Shopify store should be ready to sell products to the public.
I forgot to mention that you don’t need to subscribe to a higher payment plan unless you really feel the need to. You’ll also be okay with the Basic Shopify plan at $29 per month as a beginner.
And if you haven’t started your Shopify store even yet, then this is the time!
Click here to visit the Shopify website and start creating your eCommerce store right now.
If you ever feel stuck in the process, you can always contact the Shopify support team through their 24×7 live chat option.
Now, make sure to comment below on exactly how long it took you to launch your Shopify store.


[…] Steps To Launch Your Shopify StoreSteps To Launch Your Shopify Store […]